Use Bootstrap Modal as UI Alert Popup Dialog In Rails

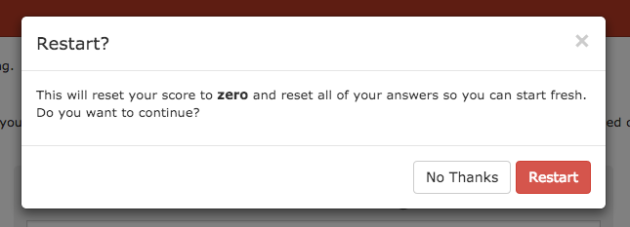
I found a cool new gem to easily let you somewhat customize the alert dialog boxes in your rails app.  I started out using the jQuery UI dialog and attempting to customize it myself, but ran into a bit of complications.  I found the data-confirm-modal gem to be a great solution.

As the documentation says, add the gem to your gemfile and run bundle.  Then don’t forget to add it to your application.js file:

//= require data-confirm-modal

Basically it just makes all alert popup dialogs become Bootstrap modals in your rails app, such as when you delete stuff or anytime you want a confirm dialog.

Props to ifad for a simple and useful gem!

Screen Shot 2014-09-28 at 4.42.19 PM

Put a Link in a Rails Notice

Sometimes you may want to put a link in your rails flash notice.  In my case I wanted to link to another site.

Here’s how.

In my controller:

notice: 'Click to go to <a href="www.yoursite.com">website.</a>'.html_safe

Notice the .html_safe function called on the string.

Credit here and here.

Change or Set Form Input Value with jQuery, CoffeeScript

So this is pretty basic, but it took me 10 minutes of Googling to figure it out.  If you need to specifically assign a value to a form input, here is how to do it via coffeescript:

$(".submit").on "click", ->
  email = $('input[name="user[email]"]').val();
  $('.hiddenEmail').val(email);

The key is the .val() method. To get the value of an element, you call the .val() method without passing in any parameters.

email = $('input[name="user[email]"]').val();

To set the value of an element, you pass in the value you want into the .val() method.

$('.hiddenEmail').val(email);

Some credit here.

Fixing Nested http Params Are HTML Escaped with Slashes

This may not be super common, but it was hard to debug for me. I had an error when I was posting form parameters using the .post_form method from one rails app to another, where a nested params hash was getting html escaped and ending up with tons of slashes or backslashes appearing in the params hash, like this:

Parameters: {"utf8"=>"✓", "authenticity_token"=>"anLqF1UcQULf35xHJZW5Ya9rjMAgkse7h1R=", "user"=>"{\"name\"=>\"nqne\", \"last_name\"=>\"nwen\", \"email\"=>\"laughing@gmail.com\", \"password\"=>\"foobartest\", \"password_confirmation\"=>\"foobartest\"}"}

Now obviously when I was trying to receive these parameters in my other rails app, it was not reading them correctly. Apparently this happens because the .post_form method turns nested hashes into escaped strings for some reason. This is the code that was giving me this error:

require "net/http"
uri = URI('http://www.myotherrailsapp.com')
x = Net::HTTP.post_form(uri, params)

As you can see, when I post a nested params hash via .post_form, it escapes them as html strings. The way I solved this was to switch to using the .post method. So replacing the third line above with:

http = Net::HTTP.new(uri.host)
response = http.post(uri.path, params.to_query)	

Note also that I call the .to_query method on the params hash. See this Stack Overflow question for an example of that. Essentially it converts a hash into a string.  Bingo, this solved it!

Another workaround that worked but is not ideal is to not use the rails form helper to create your form params.  So for example, the form I was submitting was created with standard rails form helpers:

<%= form_for(resource, as: resource_name, url: registration_path(resource_name)) do |f| %>
  <%= devise_error_messages! %>
  <%= f.label :name, "First Name" %> <%= f.text_field :name, autofocus: true %>
  <%= f.label :last_name %> <%= f.text_field :last_name %>
  <%= f.label :email %> <%= f.email_field :email %>
  <%= f.label :password %> <%= f.password_field :password, autocomplete: "off" %>
  <%= f.label :password_confirmation %> <%= f.password_field :password_confirmation, autocomplete: "off" %>
  <%= f.submit "Sign up" %>
<% end %>

And that creates a nested params hash that the .post_form method escapes. But if instead I just use direct html to create the params, as in the email field below:

  Sign up with your email <input name="email" type="email" autofocus="true" />

Then it doesn’t get escaped by the .post_form method. I prefer the first method, as it allows you to keep the rails form helpers in place.

(another related SO question)

Hope this was helpful!

How to Remove the “X” on jQuery UI dialog

I’ve just recently started learning how to use the jQuery UI framework.  Seems very useful, and although I haven’t personally tested yet, supposedly has good cross browser support.

I use the jQuery UI dialog box on my site. I’ll write another post about how to customize them completely, but in this case I just wanted to remove the close “X” in the upper right corner that comes in the dialog box by default.  It’s super simple; you just need to add a CSS rule to make it’s display: none;

.ui-dialog-titlebar-close {
  display: none;
}

This removes the closing “x” from all dialog boxes. If you want to just remove it from a single one, then add your own custom class to the rule above, for example:

.ui-dialog-titlebar-close .no-x {
  display: none;
}

And then just add this class to whichever dialog box you want to get rid of the “x”.

$( "#dialog" ).dialog({
  dialogClass: "no-x",
  buttons: [
    {
      text: "OK",
      click: function() {
        $( this ).dialog( "close" );
      }
    }
  ]
});

Some credit also here

Alert Confirm Dialog in CoffeeScript

I was trying to figure out how to create a confirmation alert dialog in coffeescript. Turns out like almost everything in coffeescript, its super easy.

$(".mybutton").on "click", ->
  if confirm "Ask a question?"
    # if answer yes
  else
    # if answer no

credit here

How to Center Bootstrap Columns

Sometimes you want to center the columns when using Bootstrap.  I was using only like 3 columns of varying sizes, but I wanted to get them centered. So here’s how I did it, with all credit going to minimit and this article.

Add the .row-centered class to your rows and the .col-centered class to the columns in your html.

And here’s the css for those classes:

/* centered columns styles */
.row-centered {
    text-align:center;
}
.col-centered {
    display:inline-block;
    float:none;
    /* reset the text-align */
    text-align:left;
    /* inline-block space fix */
    margin-right:-4px;
}

Create a PDF with Prawn

Prawn is a pdf generator built in ruby, that is pretty full featured.  However, I found it pretty hard to find good current documentation on using it in Rails.  Much of it was years old, and referred to older versions of prawn and older versions of Rails.  Ryan Bates’ RailsCast #153 was very helpful though, as usual.

Fortunately, there is a gem we can use:

gem 'prawn'

And of course run bundle install

Next we need to make sure Rails can accept pdfs. Your app may already have this, but if not, add this to your config/initializers/mime_types.rb file:

Mime::Type.register "application/pdf", :pdf

Now in our controller, inside the function for the view where you want to show the pdf, we need to add code for format.pdf. If you use the scaffold generator, you can see similar code to this generated automatically in the create, update, and destroy methods.

respond_to do |format|
    format.html
    format.pdf do
      pdf = Prawn::Document.new
      pdf.text "this is a pdf"
      send_data pdf.render_file
    end
  end

So we add the respond_to block, and we need the format.html line to ensure the normal html view still gets loaded. The format.pdf block will be run when we load the .pdf extension of the url address in the browser. For example, if your show view is localhost:3000/users/1, then if you now load localhost:3000/users/1.pdf, it should load the sample pdf we created. The pdf = Prawn::Document.new instantiates a new pdf using Prawn, and the pdf.render_file line actually creates the file. Now you’ll probably notice if you run this that the pdf will download. That’s because the send_data default is to download. If we pass the option disposition: inline then it will show in the browser rather than download. As shown below:

send_data pdf.render, filename: "mypdf.pdf",
                      type: "application/pdf",
  	              disposition: "inline"

We can also pass in several options when we create the pdf

img = "#{Rails.root}/app/assets/images/my_image.jpg"
pdf = Prawn::Document.new(background: img, :page_size => "LETTER", :page_layout => :landscape)

Here I create a background image for the pdf, and pass in the page size and make the layout landscape. A good resource for all the options is the Prawn resource manual. Now in my case I wanted to save the file into the database, rather than just displaying it in the browser.  So in my User model I created a column called certificate, and this is how I save the pdf to that column in the database. First I setup the paperclip gem to handle attached files. To do this, add gem ‘paperclip’ in your gem file, run bundle install, then run a migration from the command line adding the column for the attached file to the database, in my case

rails generate paperclip user certificate

and add this in the model where you want the attachment:

has_attached_file :certificate
validates_attachment_content_type :certificate, :content_type => "application/pdf"

Now that paperclip is setup, back to Prawn.  I want set a custom path to where to save the pdf. I created a path in my app to store pdfs: /app/pdfs and run this line to save the file there:

pdf.render_file File.join(Rails.root, "app/pdfs", "x.pdf")

Now that its saved in my app, I can save it to the database,

current_user.certificate = File.open("#{Rails.root}/app/pdfs/x.pdf")
current_user.save!

Now I can access the file in the view if I want

<iframe class="center" src="<%= current_user.certificate %>" width="300" height="150"> width="750" height="580"style="border: none;"> 

In summary, here’s the full code I use in the controller. Note that since I’m saving the file rather than displaying it directly in the browser, I don’t need the format.pdf block anymore.

img = "#{Rails.root}/app/assets/images/certificate.jpg"
pdf = Prawn::Document.new(background: img, :page_size => "LETTER", :page_layout => :landscape)
pdf.font "Helvetica", style: :bold
pdf.font_size 34
pdf.draw_text current_user.name, at: [300, 380]
pdf.draw_text Date.today.strftime("%A %B %e %Y "), at: [135, 55]
pdf.render_file File.join(Rails.root, "app/pdfs", "x.pdf")
current_user.certificate = File.open("#{Rails.root}/app/pdfs/x.pdf")
current_user.save!

I have another post about using strftime to format Dates in Ruby, and one about fonts that you can use with Prawn. Other helpful resources I found were:

StackOverflow questionStack Overflow question 2, SO question 3, and this Sitepoint post,

There is also a cool prawn-rails gem that is convenient, although note that in the Gemfile you need to put prawn_rails with an underscore, not a dash. Here’s a demo site with examples of this gem.
CSS or Javascript Assets not Working on Heroku Production

I had a weird issue where on my local environment, everything worked fine, but on production when pushed to heroku, my javascript and css files weren’t getting loaded.

Now I don’t fully understand the asset pipeline and if/how it was involved in this error, but here’s what worked for me.

Simply manually precompile assets prior to pushing to heroku:

bundle exec rake assets:precompile

You will notice that this create a bunch of files.  Then you need to commit to git, and push to heroku again.

git add .
git commit -am "message"
git push origin master
git push heroku master

If you know a good explanation of why this is necessary, please let me know!

Credit here.

Save PDF to User Model in Ruby on Rails Using Paperclip and Prawn

I’m using paperclip and prawn to create pdf certificates for users and save them to the user model in the background.

Paperclip is often used for user uploaded files, such as images, so I was uncertain how to save the pdf that was created with prawn to the user model, since the user did not upload it themselves.  Actually turns out its pretty simple.

Once the pdf is created with Prawn (which I’ll write another post about), we simply use this code to save it to User.certificate in the database.

current_user.certificate = File.open("#{Rails.root}/app/pdfs/x.pdf")
current_user.save!

So the trick here is to call File.open and pass in the path to the pdf that I created in the background. Then simply save it to the user’s certificate.  The exclamation point is used on the save command to indicate that the command alters the object that its called on.  The exclamation point is often called a ‘bang’ in Ruby.

Credit here and here.