Rails Paperclip Attachments Amazon Cloudfront CDN with Signed URLs using the Cloudfront-signer Gem and Tricky YAML
August 9, 2017 Leave a comment
So here’s what I was trying to do. I have a Rails app where users upload attachments. In my case they are pdf’s, but I think this still applies if they were images or any other file type. I use the paperclip gem to handle the pdf attachments, and store them on Amazon S3 bucket cloud storage. This was all working fine. However, I wanted to make 2 improvements:
- Use a CDN such as Amazon Cloudfront to deliver these attachments faster globally. See this blog post that first put me on to the idea.
- I originally made the S3 bucket public to serve these assets, but I wasn’t happy with this. I wanted more security and privacy for these attached files. So after setting up the Amazon Cloudfront CDN, I wanted to use signed and expiring URL’s to protect the content.
While initially this seemed like a somewhat common and straightforward thing to do, I ran into a lot of annoying little hiccups that took way too much time to figure out. I never found somewhere where the steps to do this were all in one place. So I’m writing this to hopefully do that.
First you need to pick your CDN. There are many options, including one that looks promising called Cloudinary (and their Attachinary library), which I might switch to later and do another post or update this one. For now I chose Amazon Cloudfront since it is well documented and has lots of stackoverflow support :).
So to create an Amazon CDN distribution, login to your AWS console and click “Create Distribution”, then select a “web” distribution. For “Origin Domain Name”, pick the S3 bucket where your files are stored. This is the ‘origin’ of the files for Cloudfront. I left the “origin path” blank, as its optional. Next, give it whatever ‘origin-ID’ you want to make it descriptive to yourself. In my case I wanted to select “Restrict Bucket Access”, which then disables the Amazon S3 URLs, so your content can only be viewed from the Cloudfront URL. Then “use an existing identity” for Origin Access Identify if you have one, or create a new one and give it a useful name. Then for simplicity and ease of use I chose “Yes, Update Bucket Policy” under “Grant Read Access”. This allows the Cloudfront distribution to read the files in your S3 bucket so it can distribute them. If you don’t have it update the policy automatically, you will need to manually update the bucket policy on your S3 bucket to something like this:
{

"Version": "2008-10-17",

"Id": "PolicyForCloudFrontPrivateContent",

"Statement": [

{

"Sid": "1",

"Effect": "Allow",

"Principal": {

"AWS": "arn:aws:iam::cloudfront:user/CloudFront Origin Access Identity xxxx"

},

"Action": "s3:GetObject",

"Resource": "arn:aws:s3:::bucketname/*"

}

]

}
I left the “Origin Custom Headers” blank. Setup the “Default Cache Behavior Settings” however you see fit. I chose to redirect HTTP to HTTPS – its best to not use HTTP whenever possible. Select “Yes” for “Restrict Viewer Access” to use signed URLs, and pick the appropriate signers. Everything else I left as the default options. For “Distribution Settings” you can use CNAMEs to set up URLs to use your custom domain, but I didn’t do this. I did choose to use the default Cloudfront SSL Certificate, again for simplicity. Everything else I left as defaults, and you’re all set up! It takes a few minutes for your distribution to be fully enabled after you create it.
Awesome, we now have a Cloudfront distribution setup to deliver the assets from our S3 bucket, making it much faster. And we can use signed URLs to protect the privacy of these files. Let’s do that next.
The basic structure of signed URL’s is as follows:
{base_url}?{query_string_parameters}Expires={expiration_in_seconds_UTC}&Signature={hashed_and_signed_policy_statement}&Key-Pair-Id={key_pair_id}
The example in the AWS documentation is:
http://d111111abcdef8.cloudfront.net/image.jpg?color=red&size=medium&Expires=1357034400&Signature=nitfHRCrtziwO2HwPfWw~yYDhUF5EwRunQA-j19DzZr vDh6hQ73lDx~-ar3UocvvRQVw6EkC~GdpGQyyOSKQim-TxAnW7d8F5Kkai9HVx0FIu- 5jcQb0UEmatEXAMPLE3ReXySpLSMj0yCd3ZAB4UcBCAqEijkytL6f3fVYNGQI6&Key-Pair-Id=APKA9ONS7QCOWEXAMPLE
Ok, so the URL, query parameters, and expiration are easy. But we need to get the Signature and Key-Pair-ID.
Let’s do the Key-Pair-ID first. In your AWS console, go to the Security Credentials section, and open Cloudfront Key Pairs. Create a new key pair, then download the private and public keys. Of course, save the private key in a secure location and don’t share it with anyone. We’ll come back to them in a minute.
Now we need to add Trusted Signers, to give someone the authority to create signed URL’s. For web distributions, you need to create a Trusted Signer based on each cache behavior you have setup. For me, there was just one. Go to your AWS Cloudfront console and select the distribution settings for the distribution you’re working with. Go the Behaviors tab and select the behavior in the list – for me the only was was the redirect HTTP to HTTPS behavior. Select Edit, and choose Restrict Viewer Access, and select yourself or whoever you wish as your Trusted Signer. This account can create signed URLs.
Ok, now that we have Trusted Signers assigned, we can go ahead and create our signed URLs. The Amazon documentation for how to create signed URLs is pretty good, and you can do it manually yourself. I found this gist that pretty much gives you the ruby code to create your signed URLs – its only a few lines. But wait, this is Rails, there’s gotta be a gem for that, right? Yep, there is! It’s called cloudfront-signer.
Install the gem and run the initializer:
bundle exec rails generate cloudfront:install
Now open the created config/initializers/cloudfront_signer.rb file. This is where we will put our credentials for creating the signed URL.
As described above, we need the Cloudfront Key-Pair-ID to append to the end of the URL. This was a bit confusing for me, but your Key-Pair-Id is called “Access Key ID” in your Cloudfront Security Credentials page where you downloaded the private and public keys. See screenshot:
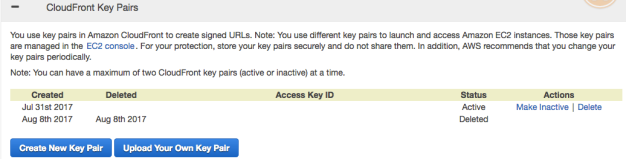
Copy the text string of capital letters under “Access Key ID” (mine is blanked out in the screenshot for security) and paste it into the cloudfront-signer.rb file for “key_pair_id”:
Aws::CF::Signer.configure do |config|

config.key_path = '/path/to/keyfile.pem'

# or config.key = ENV.fetch('PRIVATE_KEY')

config.key_pair_id  = 'XXYYZZ' # copied from your Cloudfront "Access Key ID"

config.default_expires = 3600

end
Ok, last thing we need for configuration is your private key that you downloaded in the steps above. You can either save the .pem file itself into your Rails project somewhere – making sure to add it to .gitignore so it doesn’t become public in your version control!! – or you can copy/paste the text of the key into an environment variable. I originally used the first option, but then when I wanted to push to heroku in production, I didn’t know how to reference this file in production since I didn’t have it in version control, so I decided to use an environment variable.
Sounds simple right? Well, usually, but here’s where I ran into more trouble. I didn’t know that actually the \n line breaks in your private key file are critical, and can’t be removed. (I learned that from this unrelated github issue) So to put a multi-line environment variable in an application.yml file (as is done with the figaro gem in Rails) there are some fancy yaml tricks that you need to do. If you don’t you keep getting some weird errors, such as Neither PUB key nor PRIV key: nested asn1 error (OpenSSL::PKey::RSAError) because OpenSSL tried to sign the key without the \n line breaks, making it an invalid key. It took me a long time to debug this error, but hopefully this helps save you time.
Based on what I learned from this StackOverflow question, you need to add |- in front of your key in the application.yml file to keep the line breaks, but not create one at the end of the file. So the code in your application.yml will look like this:
AWS_CLOUDFRONT_PRIVATE_KEY: |-

-----BEGIN RSA PRIVATE KEY-----

#long string key here

-----END RSA PRIVATE KEY-----
That sneaky little |- is critical!
Ok, so we have all our credentials set up. If you’re not using the gem, you need to do a bit more manually. Signed Cloudfront URL’s use a policy statement. You can create a custom one with various parameters, or use a canned policy. I just used a canned policy statement. The example in the AWS documentation is:
{

"Statement":[

{

"Resource":"base URL or stream name",

"Condition":{

"DateLessThan":{

"AWS:EpochTime":ending date and time in Unix time format and UTC

}

}

}

]

}
Our cloudfront-signer gem conveniently creates the policy statement for us.
To use the gem to create a signed URL, just call Aws::CF::Signer.sign_url {your_attachment_url}, expires: Time.now + 600. In my case I put this in my show.html page where I wanted to display the attached pdf in an iframe.
Now one more tricky note was how to add our multiline environment variable to heroku while preserving the line breaks. Based on this StackOverflow question, you can use the cat function in the terminal to save it as a variable in your terminal session, then use that to create the variable on heroku:
testvar=$(cat myfile.txt). Then heroku config:add EC2_PRIVATE_KEY="$testvar"
Whew, more complicated than it sounded at the start, huh? Hopefully this was useful and saved you some headaches!
Here’s a list of helpful links:
http://www.akitaonrails.com/2016/07/28/updating-my-old-posts-on-uploads
https://devcenter.heroku.com/articles/using-amazon-cloudfront-cdn
https://docs.aws.amazon.com/AmazonCloudFront/latest/DeveloperGuide/PrivateContent.html
https://stackoverflow.com/questions/3790454/in-yaml-how-do-i-break-a-string-over-multiple-lines
https://stackoverflow.com/questions/6942600/multi-line-config-variables-in-heroku
https://github.com/chef-cookbooks/jenkins/issues/148
https://stackoverflow.com/questions/14391312/openssl-neither-pub-key-nor-priv-key-nested-asn1-error
https://stackoverflow.com/questions/2632457/create-signed-urls-for-cloudfront-with-ruby
http://www.akitaonrails.com/2017/06/28/rails-5-1-heroku-deployment-checklist-for-heroku
http://www.akitaonrails.com/2016/07/28/updating-my-old-posts-on-uploads
http://www.akitaonrails.com/2017/07/07/upcoming-built-in-upload-solution-for-rails-5-2-activestorage
https://github.com/thoughtbot/paperclip/wiki/Restricting-Access-to-Objects-Stored-on-Amazon-S3
https://stackoverflow.com/questions/4003828/aws-s3-ruby-on-rails-heroku-security-hole-in-my-app


Recent Comments